

Table of Contents
The microscope stage is the essential flat platform that securely holds and aligns your specimen for viewing. This guide explains its critical functions, explores the different types of stages available, and provides practical tips on how to use it correctly for crystal-clear, stable observations.
What Is a Microscope Stage?
Before you can master adjusting focus or calculating magnification, you need to understand the basic anatomy of your equipment. The stage is the central physical hub of the entire device.
Location of the Stage on a Microscope
If you look at a standard compound microscope, the stage is the flat, horizontal platform located directly in the middle of the instrument. It sits securely attached to the main vertical arm, suspended directly beneath the rotating objective lenses and sitting just above the primary light source.
Main Purpose of Supporting the Slide
The fundamental purpose of the stage is to provide a perfectly flat, rigid, and stable resting place for your specimen. When you are looking at biological samples, you typically place them on a rectangular piece of glass known as a slide. The stage supports this delicate glass slide, preventing it from wobbling, bending, or falling off while you look through the eyepieces.
Main Parts Around the Stage
The stage does not operate in isolation. It is surrounded by other vital components that work together to create a visible image. Directly above the stage are the objective lenses, which magnify the sample. Directly below the stage, you will find the condenser and the iris diaphragm, which focus and control the beam of light hitting the sample. Beside the stage on the arm are the coarse and fine focus knobs, which raise and lower the stage to bring the image into sharp clarity.

Different Types of Microscope Stages
Not all microscopes use the exact same platform. Depending on the complexity and cost of the instrument, you will encounter a few different variations of the microscope stage.
Simple Stage for Basic Observation
A simple stage is exactly what it sounds like: a stationary, flat metal or plastic square equipped with two basic metal clips. To view different parts of your specimen, you must physically push the glass slide around with your fingers. This type of stage is incredibly common on beginner microscopes and children's educational models. While highly affordable, moving the slide by hand can feel jerky and imprecise at high magnifications.
Mechanical Stage for Precise Movement
A mechanical stage is standard on almost all professional and high-quality student microscopes. Instead of pushing the slide with your fingers, the slide is locked into a highly precise metal bracket. You then turn two small knobs to move the bracket smoothly left and right (the X-axis) or forward and backward (the Y-axis). This mechanical advantage allows for incredibly fine, controlled movements without ever touching the glass.
Specialized Stages for Advanced Microscopy
In advanced laboratories, standard mechanical stages are often swapped out for specialized equipment. For example, a heated stage is used by biologists to keep live cells or semen samples at body temperature during observation. A rotating circular stage is frequently used by geologists looking at mineral samples under polarized light, allowing them to spin the sample 360 degrees to observe crystalline structures.
Functions of a Microscope Stage
The stage is far more than just a table for your glass slide. It performs several critical functions that make high-magnification viewing physically possible.
Holds the Specimen in Place
When you are looking at an object magnified hundreds of times, a vibration as small as a heartbeat can send the image flying off the screen. The stage provides the absolute rigidity required to keep the specimen locked perfectly still. By eliminating environmental vibrations, the stage ensures that your view remains stable and clear.
Keeps the Specimen in Position
Microscope lenses have an incredibly shallow depth of focus. If a specimen shifts upward or downward by a fraction of a millimeter, it will blur entirely. The stage locks the glass slide into a consistent horizontal plane, ensuring that once you find the perfect focal point, the sample stays exactly within that precise optical range.
Helps Center the Specimen for Viewing
Lenses are only effective if the object you want to see is placed exactly in the middle of the light path. The flat surface of the stage, especially when equipped with mechanical controls, gives you the spatial framework needed to carefully align the most interesting part of your sample dead-center beneath the objective lens.
Allows Light to Reach the Specimen
Most biological samples are viewed by passing light completely through them. If the stage were a solid block of metal, the bottom light would be entirely blocked. The stage is specifically designed to allow illumination to pass upward from the bulb, through the stage, and into the viewing lenses.
How the Stage Works With Other Parts
The stage acts as the physical bridge between your sample, the lighting system, and the physical controls of the microscope.
Stage Clips Keep the Slide Secure
Almost all stages feature stage clips. On a simple stage, these are usually two spring-tensioned metal strips that press the glass down against the platform. On a mechanical stage, the clip is usually a curved, spring-loaded arm that gently but firmly hugs the corner of the slide, pushing it securely into the mechanical bracket.
The Stage Opening Allows Light to Pass Through
If you look at the center of the stage, you will notice a circular hole. This is the stage aperture or opening. This hole is perfectly aligned with both the light source below and the lenses above. It serves as the physical window that allows concentrated light from the condenser to shine directly up and through your glass slide.
Mechanical Controls Improve Positioning Accuracy
On mechanical stages, the X and Y translational knobs work alongside the main stage platform. When you turn these knobs, tiny gears move the slide bracket across the surface of the stage. This creates a beautifully coordinated system where the stage provides the stable floor, and the mechanical controls provide the precise navigation across that floor.
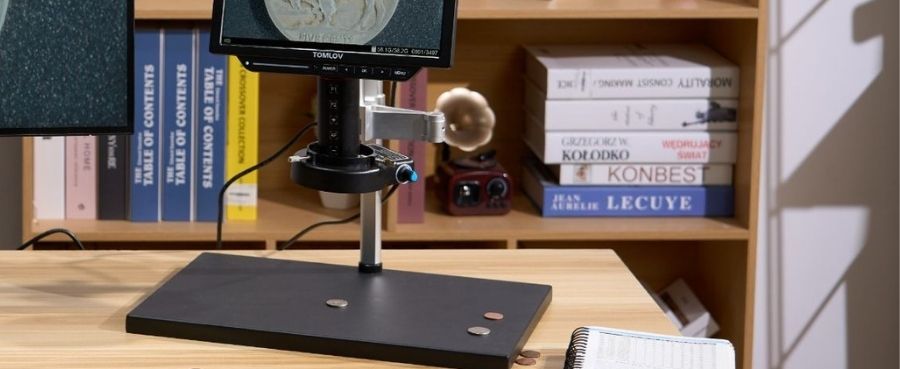
While traditional microscopes often rely on mechanical stages to move slides under the lens, HDMI digital microscopes can use a stable working platform and adjustable viewing setup to make specimen positioning easier.
For example, TOMLOV TRIL110 10.1" 3 Lens 2K HDMI Digital Microscope is designed with a stable stand and a large display that allows users to observe and adjust specimens comfortably without looking through a traditional eyepiece. Its 3 lens system also makes it easier to switch between different observation needs, from larger objects to finer details.

How to Use a Microscope Stage Correctly
Properly utilizing the stage prevents accidental damage to your expensive lenses and ensures a frustration-free viewing experience.
Place and Secure the Slide
Always start by lowering the stage completely using the coarse focus knob. This gives you plenty of physical room to work. Open the stage clip, lay the glass slide completely flat against the stage surface, and gently release the clip so it holds the slide securely. Ensure the glass is lying flat and is not accidentally propped up on the edge of the metal bracket.
Center the Specimen Over the Light Opening
Before you ever look through the eyepieces, look at the stage from the side. Use your mechanical knobs (or your fingers on a simple stage) to move the slide until the colorful or stained part of your specimen is resting directly over the bright circle of light shining through the stage opening.
Adjust the Position at Higher Magnification
Once you have the object in focus at a low magnification, you can switch to a higher-power lens. At higher magnifications, your field of view becomes incredibly narrow. Use only the mechanical stage knobs to make micro-adjustments to the slide's position. Moving the slide by hand at high power will almost certainly push the specimen entirely out of your viewing area.
Final Thoughts
The microscope stage is the steady foundation of all optical exploration. Whether you are using a basic platform with simple metal clips or a highly advanced mechanical stage with precision controls, its purpose remains the same. By holding your specimen securely, keeping it within the focal plane, and allowing light to pass through efficiently, the stage makes the invisible world beautifully visible.
FAQs
What are the 12 main parts of a microscope?
While designs vary, the 12 standard parts of a compound microscope include the eyepiece (ocular lens), the objective lenses, the revolving nosepiece, the arm, the base, the stage, the stage clips, the coarse focus knob, the fine focus knob, the condenser, the iris diaphragm, and the light source (illuminator).
What are three types of stages used in microscopy?
The three most common types are the simple stage (a flat platform moved manually), the mechanical stage (featuring geared knobs for precise X and Y movement), and specialized stages (such as heated stages for live cells or rotating stages for geological polarization).
What is the function of the stage control knob on a microscope?
The stage control knobs, found on mechanical stages, consist of two dials. One knob moves the slide bracket left and right along the X-axis, while the other moves it forward and backward along the Y-axis. This allows for incredibly smooth and precise navigation across the specimen without touching the glass.
Does the microscope stage affect image quality?
Yes, absolutely. If the stage is loose, unstable, or bent, environmental vibrations will translate directly into the glass slide, causing a blurry and shaky image. A rigid, perfectly flat stage is essential for maintaining a crisp focal point, especially at very high magnifications.
Do digital microscopes have a stage like compound microscopes?
Yes, many digital microscopes feature a stage. While they lack an optical eyepiece, the physical mechanics remain similar. They require a stable base or platform to place coins, circuit boards, or slides on to keep them entirely still while the digital camera sensor captures the magnified image.


Commenta
Nota che i commenti devono essere approvati prima di essere pubblicati.
Questo sito è protetto da hCaptcha e applica le Norme sulla privacy e i Termini di servizio di hCaptcha.