
Table of Contents
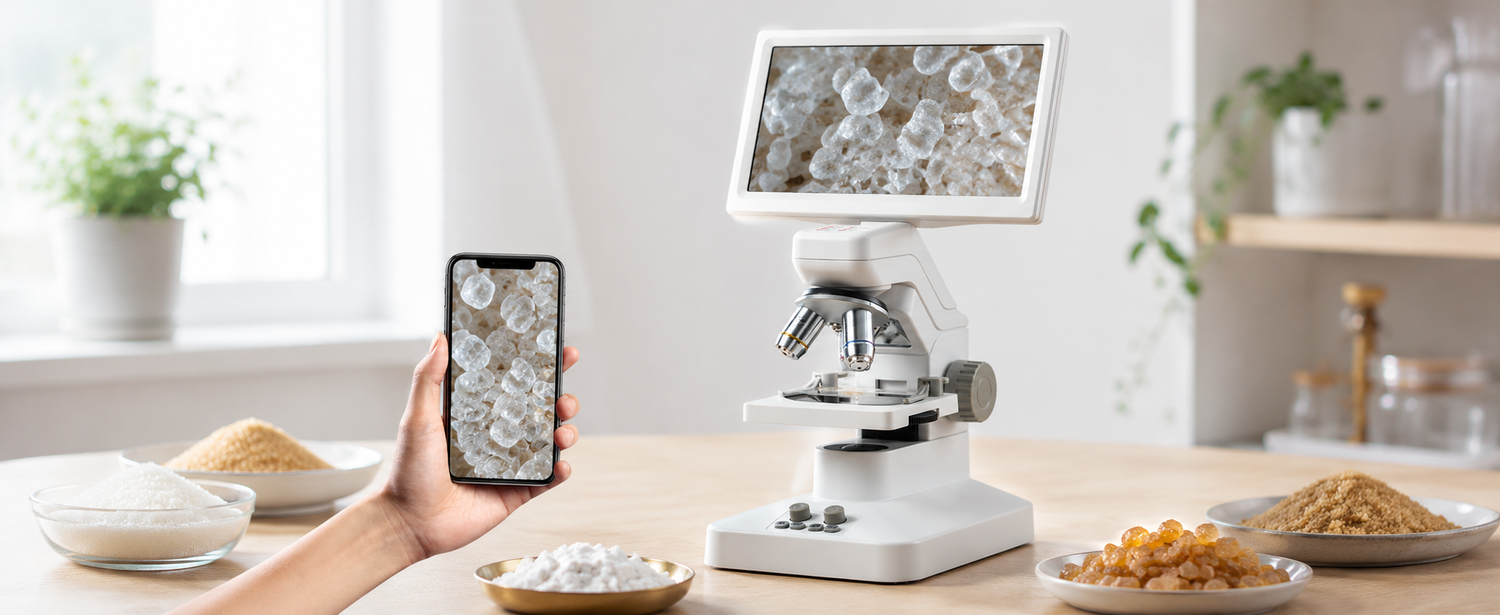
Sugar crystals look simple in a jar, but under a digital microscope they can appear like tiny pieces of glass, rock, dust, and broken geometric shapes. Different sugar types show different details: granulated sugar often has sharper crystal edges, brown sugar shows clumps and surface texture, powdered sugar looks like fine particles, and rock sugar reveals larger structures. This guide shows beginners how to prepare dry sugar samples, adjust lighting, compare crystal shapes, and avoid common mistakes.
What Can Different Sugar Crystals Show Under a Digital Microscope?
Granulated Sugar for Sharp Edges and Flat Faces
Granulated sugar is the easiest place to start. Under a digital microscope, individual grains may show flat faces, sharp edges, and clear or semi-transparent surfaces. Some crystals look regular, while others appear chipped, cloudy, or uneven.
Because granulated sugar grains are large enough to separate, they are useful for learning how lighting, focus, and background affect what you can see.
Brown Sugar for Clumps and Surface Texture
Brown sugar usually looks less clean and glass-like than white granulated sugar. Its grains may appear darker, stickier, and more irregular. You may see clumps, rough surfaces, and small particles attached to larger pieces.
This makes brown sugar useful for comparison. Instead of looking only at crystal shape, you can observe how moisture and coating change the surface appearance.
Powdered Sugar for Fine Particles and Sugar Dust
Powdered sugar looks very different from granulated sugar. Instead of clear, separate crystals, you may see fine dust-like particles, tiny clumps, and soft-looking piles.
This sample can be harder to observe because the particles are small and easily scattered. Use only a tiny amount and spread it thinly so the microscope can focus on individual areas.
Rock Sugar for Larger Crystal Structures
Rock sugar is useful because its crystals are much larger. Under a digital microscope, you may see broad surfaces, broken edges, cracks, and layered-looking areas.
You do not need high magnification at first. A wider view can be more useful because it shows the overall crystal structure before you move closer to inspect edges and surface details.
Broken Pieces, Clear Surfaces, and Irregular Shapes
Not every sugar crystal looks perfect. Some pieces are broken, rounded, scratched, or stuck to other particles. These irregular shapes are part of what makes the observation interesting.
Look for differences between clear surfaces, cloudy areas, sharp corners, and fractured edges. The goal is not to identify sugar chemically, but to compare visible shapes and textures.

How Should You Prepare Sugar Samples for Observation?
Use a Digital Microscope With Adjustable Top Lighting
Sugar crystals are dry surface samples, so top lighting is usually the most useful. Adjustable lighting matters because clear crystals can reflect light strongly and become washed out.
For this kind of dry specimen, a digital microscope for specimen observation can make it easier to view crystals on a screen, adjust light, and compare the same sample from different angles.
Choose a Dark or Plain Background for Contrast
Background choice affects what you can see. White sugar may disappear on a white surface, while a dark background can make crystal edges easier to notice. Brown sugar may show better on a plain light background.
Avoid patterned paper or textured surfaces. A simple dark card, clean white paper, or smooth plastic background is usually enough.
Keep the Sugar Dry Before Viewing
Keep the sugar dry before observation. Moisture can make crystals clump, soften, or dissolve slightly. That may be interesting for a separate experiment, but it changes the sample.
For a basic observation guide, dry sugar is easier to compare because the crystals keep their shape and are easier to move.
Spread Only a Few Crystals at a Time
Use only a few crystals at once. A large pile makes it hard to focus because some grains sit higher than others. It also blocks the view and hides individual edges.
Sprinkle a tiny amount onto the background, then separate a few grains with tweezers or a small piece of paper.
Separate and Label Each Sugar Type Clearly
If you compare several sugar types, keep them separate. Use small dishes, paper squares, or labeled areas. Write simple labels such as “granulated,” “brown,” “powdered,” and “rock sugar.”
This prevents confusion when you take photos later. It also makes the comparison more useful because each image can be matched to the correct sample.

How Do You View and Compare Sugar Crystals Under a Digital Microscope?
Start at Low Magnification to Find Clear Crystals
Start at low magnification. This gives you a wider view and helps you find crystals that are flat, separated, and easy to focus on. Do not zoom in immediately.
Choose one clear crystal or one small group of crystals first. Once the sample is centered and stable, increase magnification gradually.
Adjust Lighting to Reduce Glare
Sugar crystals can reflect light strongly. If the image looks too bright, reduce the LED brightness or shift the sample slightly until the edges and flat faces become clearer. Strong glare can make transparent crystals look blank, even when the focus is correct.
For beginners using a screen-based setup, the TOMLOV DM301 Pro digital microscope is useful here because you can adjust lighting and focus while watching the crystal surface change in real time.
Increase Magnification for Edges and Surface Detail
After finding a clear crystal, increase magnification to inspect edges, corners, chips, and surface texture. Focus slowly. Sugar crystals are three-dimensional, so one part may be sharp while another part looks soft.
Do not chase the highest magnification first. A clear medium-magnification view is usually more useful than a blurry close-up.
Move Across the Sample Slowly
Move the sample slowly across the viewing area. Compare a large crystal, a broken piece, a clump, and a fine particle. This helps you understand how varied one sugar sample can be.
If you move too quickly, it is easy to miss useful details or lose focus. Small adjustments work better than large movements.
Compare Crystal Shape, Size, and Transparency
When comparing sugar types, look at three main things: shape, size, and transparency. Granulated sugar may look clearer and more angular. Brown sugar may look darker and clumped. Powdered sugar may look fine and dusty. Rock sugar may show large broken surfaces.
Use visual descriptions rather than lab conclusions. Words like clear, cloudy, sharp, rounded, clumped, dusty, or broken are enough for beginner notes.
Use the Same Magnification for Each Sample
Use the same magnification when comparing samples. If granulated sugar is viewed at one magnification and powdered sugar at another, the size comparison may be misleading.
Keep the background and lighting similar too. This makes your images easier to compare and prevents lighting from becoming the main difference.
Save Images Before Changing the Setup
Take photos before moving to another sample. Capture one wider image showing the overall crystal group, then one closer image showing edges, chips, or surface details. This gives you a better comparison record than relying on one close-up image.
When you compare several sugar types later, clearer images make small differences easier to review, such as whether one sample looks sharper, cloudier, more transparent, or more broken. A 4K digital microscope works naturally for this kind of visual record because the main task is comparing saved images, not just viewing one crystal once.
What Mistakes Should Beginners Avoid?
Do Not Use Too Much Sugar at Once
Too much sugar creates a pile, not a clear sample. Crystals overlap, block each other, and sit at different heights, making focus difficult.
Use a small amount and spread it thinly. A few separated crystals will teach you more than a crowded pile.
Do Not Let Moisture Change the Crystals
Moisture can make sugar clump, soften, or dissolve. Even a damp surface can change the crystal edges before you finish observing.
Keep the background dry, avoid breathing directly on the sample, and store sugar types separately. Use a fresh dry sample if the crystals start to look sticky or melted.
Do Not Confuse Dust or Clumps With Crystal Shape
Powdered sugar, brown sugar, and old samples may contain dust, clumps, or small loose particles. These can look like part of the crystal structure when they are only sitting on the surface.
Move to a cleaner area and compare several particles before describing the shape.
Do Not Expect to See Sugar Molecules
A digital microscope can show sugar crystals, particles, edges, and surface texture, but it cannot show individual sugar molecules. Molecules are far smaller than what a light-based digital microscope can resolve.
The useful observation here is the visible crystal form, not the molecular structure.
Conclusion
Sugar crystals are simple, safe, and useful samples for beginner microscope observation. Granulated sugar can show sharp edges and flat faces. Brown sugar reveals clumps and surface texture. Powdered sugar shows fine particles, while rock sugar offers larger crystal structures.
For the clearest results, keep the samples dry, use only a few crystals, choose a plain background, adjust top lighting carefully, and compare each sugar type at the same magnification. Treat the images as visual observations of crystal shape and texture, not chemical analysis.
FAQs
What Magnification Do You Need to See Sugar Crystals?
Start with low magnification to find clear, separated crystals. Then increase magnification gradually to inspect edges, flat faces, chips, and surface texture. The best view is usually not the highest setting. Good lighting, a dry sample, and a stable background matter just as much as magnification.
Why Do Sugar Crystals Look Like Glass Under a Microscope?
Sugar crystals can look glass-like because they have clear or semi-transparent surfaces that reflect and transmit light. Under top lighting, their edges and flat faces may shine strongly. If the image looks too bright, reduce the light or change the sample angle to bring back surface detail.
Do Different Types of Sugar Look Different Under a Microscope?
Yes. Granulated sugar often shows clearer crystal edges, brown sugar may show clumps and darker surface texture, powdered sugar appears as fine particles, and rock sugar reveals larger crystal structures. Comparing them at the same magnification makes the differences easier to see.
Can You See Sugar Molecules With a Digital Microscope?
No. A digital microscope can show sugar crystals and visible surface details, but it cannot show individual sugar molecules. Molecules are much smaller than the resolution of a typical light-based digital microscope. For this activity, focus on crystal shape, size, edges, and texture.
Why Do My Sugar Crystals Look Blurry or Too Bright?
Blurry or overly bright images usually come from glare, too much sugar, uneven sample height, or poor focus. Use fewer crystals, spread them apart, lower the light, and adjust focus slowly. A plain background can also help crystal edges stand out more clearly.

Commenta
Nota che i commenti devono essere approvati prima di essere pubblicati.
Questo sito è protetto da hCaptcha e applica le Norme sulla privacy e i Termini di servizio di hCaptcha.