Table of Contents
Cardiac muscle is the tissue that keeps your heart beating, and viewing it is straightforward with the right setup. Place a prepared H&E slide on a compound microscope, start at 4x to find the tissue, and work up to 400x to see the striated, branching fibers and the dark intercalated discs that make cardiac muscle unique. Why bother looking? Cardiac muscle is one of the few tissues in your body that never rests, and its structure directly reflects that job. Seeing how the fibers branch and connect explains how the heart contracts as a single unit and what sets it apart from skeletal or smooth muscle.
What You Need Before You Start
The setup is simple. You'll need a prepared microscope slide of cardiac muscle tissue — these are usually stained with H&E (hematoxylin and eosin), which dyes the nuclei purple and the cytoplasm pink so the cellular details actually show up. You'll also need a brightfield compound microscope with objectives at 4x, 10x, and 40x. A 100x oil immersion objective is a nice extra but not essential for identifying the main features.
Preparing your own cardiac muscle slide from scratch is a different project entirely — it involves fixing, embedding, sectioning, and staining tissue, which needs lab equipment most people don't have at home. For viewing purposes, a commercially prepared slide paired with a reliable 4k digital microscope is the practical choice.

What Is the Best Microscope for Viewing Cardiac Muscle?
Compound Microscope
A compound light microscope is the right tool. Its layered optics and high magnification range are built for exactly this kind of work — thin, stained tissue sections where you need to resolve cell-level detail. Any decent compound microscope with 4x, 10x, and 40x objectives will show you everything described in this article.
Digital Microscope
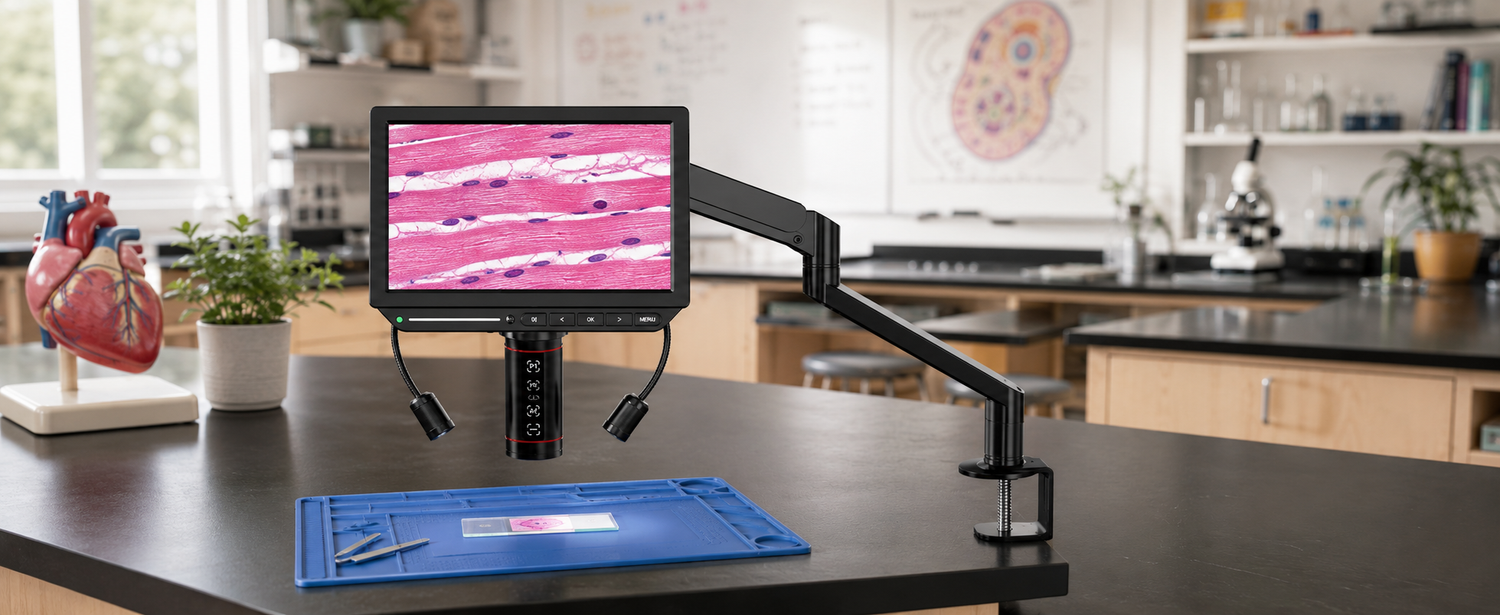
Digital compound microscopes send the image to a built-in screen or computer instead of an eyepiece. For cardiac muscle, this makes a real difference if you're teaching, recording, or comparing slides side by side. You can zoom into intercalated discs on a large display and point them out without anyone taking turns at the eyepiece. The digital microscope options for histology work cover the full 40x to 400x range that this kind of slide needs.
Stereo Microscope
Stereo microscopes give a three-dimensional, low-magnification view of solid objects — coins, insects, circuit boards. They top out well below the magnification you need for tissue work and aren't designed for thin stained sections. Skip them for cardiac muscle.
How to Set Up Your Slide for Viewing
Place the prepared slide on the stage with the coverslip facing up, and secure it with the stage clips. Rotate the nosepiece to the 4x objective — always start with the lowest power, regardless of what you're trying to see. Bring the stage close to the objective using the coarse focus, then look through the eyepiece and slowly back the stage away until the tissue snaps into focus. Adjust the light intensity so the field is bright but not glaring, and open the diaphragm to give the tissue good contrast.
If the slide looks empty or you only see pink smears, move the stage around — cardiac tissue sections are small, and you might be looking at an edge rather than the tissue itself.
What You Will See at Different Magnifications
40x Magnification (4x Objective Lens)
This is your orientation view. The tissue looks like a pink mesh with darker purple specks scattered through it. You can see the overall shape of the section and pick out areas where the muscle fibers run in different directions. Find a region where the fibers are cut lengthwise — those give the most informative view at higher power.
100x Magnification (10x Objective Lens)
Now the woven, branching character of cardiac muscle becomes obvious. Individual fibers come into view, and you can see them splitting and rejoining in a way that skeletal muscle never does. The purple nuclei are visible as oval dots inside the fibers. Center your area of interest before moving up.
400x Magnification (40x Objective Lens)
This is where the identifying features show up clearly. You'll see the striations across the fibers, the central nuclei, and — on a good slide — the intercalated discs. Use only the fine focus knob at this magnification; the coarse focus will drive the objective straight through the slide.
How to Identify Cardiac Muscle
Striations Across the Fibers
At 400x, look for alternating light and dark bands running across the muscle fibers. These stripes come from the overlapping arrangement of actin and myosin filaments inside each cell. Cardiac and skeletal muscle both show striations — smooth muscle doesn't.
A Single Central Nucleus
Each cardiac muscle cell has one oval nucleus sitting right in the middle of the cell. This is one of the clearest ways to distinguish cardiac from skeletal muscle, where nuclei are pushed to the edges and there are many per fiber.
Branching, Interconnected Cells
Cardiac fibers don't run in straight parallel lines. They split, branch, and reconnect to form a network. This branching pattern is unique to cardiac muscle and is usually visible by 100x.
Intercalated Discs
The most distinctive feature of cardiac muscle. They may not be visible on every slide and can appear as dark transverse lines crossing adjacent cardiac muscle fibers. These are specialized junctions between cells that let electrical signals pass directly from one cardiomyocyte to the next — which is how the heart contracts as a coordinated unit rather than a bag of independent cells.
How Cardiac Muscle Differs From Skeletal and Smooth Muscle
Cardiac vs Skeletal Muscle
Both are striated, which trips up beginners. The differences are in the cells themselves. Skeletal muscle fibers are long, straight, parallel, and have many nuclei pushed to the outer edge of each fiber. Cardiac fibers branch, interconnect, and have a single nucleus centered in each cell. And only cardiac muscle has intercalated discs.
Cardiac vs Smooth Muscle
Smooth muscle has no striations at all — the cells look like simple spindle shapes with a single central nucleus, packed together in sheets. The presence of striations alone rules out smooth muscle. If you're looking at stripes, you're looking at either skeletal or cardiac.

What Common Mistakes Should You Avoid While Viewing?
Skipping Low Power and Jumping to High Magnification
It's tempting to swing straight to 40x for the detailed view, but at high power your field of view is tiny and finding the tissue is nearly impossible. Always start at 4x, locate the tissue, center it, and step up.
Using the Coarse Focus on High Power
The coarse focus moves the stage in large increments. At 400x, the objective sits millimeters from the coverslip, and one wrong turn cracks the slide or scratches the lens. Once you've moved past 10x, only use the fine focus knob.
Confusing Fiber Overlaps With Intercalated Discs
Where two fibers cross or overlap, you can get a dark line that looks like an intercalated disc but isn't. Real intercalated discs run perpendicular to the long axis of a single fiber and have a characteristic step-like or zigzag shape. If the dark line connects two fibers running in different directions, it's an overlap, not a disc.
For documenting what you find or sharing the view with students, digital microscopes with built-in screens make this much easier — they capture and display cardiac muscle features directly on screen. A Tomlov digital microscope, for example, lets you record the branching fibers and intercalated discs for later review, presentations, or classroom discussion.
Conclusion
Cardiac muscle is one of the more rewarding tissues to view under a microscope — it has clear, distinctive features and a structure that directly reflects what it does in the body. Get a prepared H&E slide, start at 4x, work up to 400x, and look for the four signatures: striations, central nuclei, branching fibers, and intercalated discs. Once you've seen them together, you'll recognize cardiac muscle instantly on any future slide. The whole process takes about fifteen minutes and shows you something most people only ever see in textbook diagrams.
FAQs
How to identify cardiac muscle under a microscope?
Look for four features together: striations running across the fibers, a single oval nucleus centered in each cell, branching fibers that interconnect rather than running parallel, and dark intercalated discs crossing the fibers perpendicularly. All four together confirm cardiac muscle.
When observing cardiac muscle under a microscope?
Start at 4x to locate the tissue, move to 10x to see the branching pattern, then switch to 40x (400x total magnification) to resolve striations, central nuclei, and intercalated discs. Use only the fine focus past 10x to avoid driving the objective into the slide.
Which image shows cardiac muscle?
The image showing branching, striated fibers with single central nuclei and dark perpendicular lines between cells is cardiac muscle. Straight parallel striated fibers with many peripheral nuclei are skeletal muscle, and spindle-shaped cells with no striations are smooth muscle.
What muscle never stops?
Cardiac muscle. The heart beats roughly 100,000 times a day from before birth until death, without rest. Its intercalated discs and interconnected network are what allow it to contract as a single coordinated unit reliably enough to keep that up for a lifetime.
Why is cardiac muscle stained pink and purple on slides?
That's H&E staining — hematoxylin dyes the nuclei purple-blue and eosin dyes the cytoplasm and muscle fibers pink. The two-color contrast is what makes the central nuclei, striations, and intercalated discs visible against the rest of the tissue.


Commenta
Nota che i commenti devono essere approvati prima di essere pubblicati.
Questo sito è protetto da hCaptcha e applica le Norme sulla privacy e i Termini di servizio di hCaptcha.