
Table of Contents
Snow reveals an incredibly intricate geometric world when viewed under magnification. This guide explores the diverse crystalline structures of snowflakes, explains how temperature and humidity dictate their shapes, and provides essential techniques for photographing these delicate ice formations.
Snow Under a Microscope
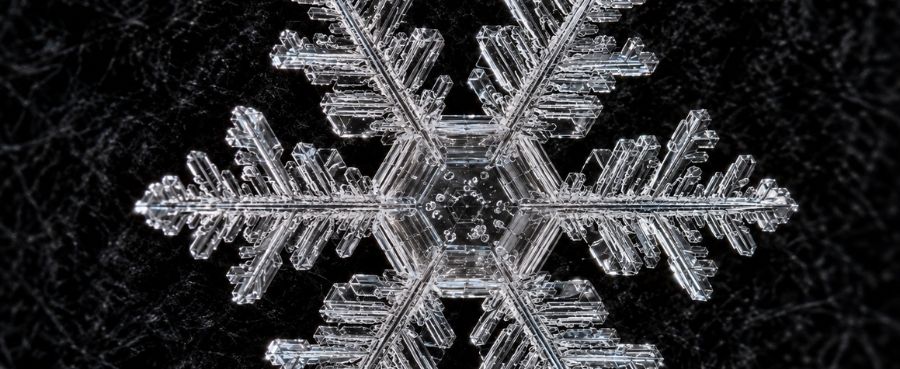
Six-Sided Snowflake Patterns
At the molecular level, water molecules freeze into a hexagonal lattice. This fundamental chemistry dictates that almost every snowflake you observe will exhibit a six-sided structure. The classic star-shaped snowflake is a direct physical manifestation of this underlying atomic geometry.
Branches, Plates, Needles, and Columns
While the classic branching star (stellar dendrite) is the most famous, magnification reveals massive variety. You will often see solid hexagonal plates that look like microscopic stop signs, long slender ice needles, and hollow columns that resemble tiny transparent spools of thread.
Snowflakes vs. Snow Clumps
A true snowflake is a single, uninterrupted ice crystal. However, when you look at a pinch of snow from the ground, you are usually observing a chaotic, tangled clump of hundreds of broken crystals that collided and fused together during their descent.
Why Snowflakes Have Different Shapes
How Ice Crystals Form
Snowflakes do not form from freezing liquid water drops—that creates sleet. A snowflake forms when water vapor in the atmosphere sublimates directly into solid ice around a microscopic speck of dust or pollen, bypassing the liquid phase entirely.
How Temperature and Humidity Affect Shape
The exact morphology of the crystal is dictated by the atmospheric conditions it encounters. Extremely cold, dry air produces simple flat plates and solid columns. Warmer, highly humid air fuels rapid freezing, growing the elaborate, branching arms of stellar dendrites.
Why No Two Snowflakes Look Exactly Alike
As a crystal falls, it tumbles through thousands of different micro-environments with fluctuating temperatures and moisture levels. Because every crystal takes a unique trajectory to the ground, no two experience the exact same growth conditions, resulting in an infinite variety of final shapes.
How to Observe Snow Under a Microscope

Prepare a Cold Collection Surface
Heat is your greatest enemy. Place glass microscope slides, a piece of black velvet, or dark construction paper in the freezer or outside for at least thirty minutes before it snows. A warm slide will melt the crystal on contact.
Collect and Transfer Snowflakes Gently
Let the snow fall directly onto your pre-chilled slides. If you need to move a crystal, never use your fingers. Use a pre-chilled, fine-tipped artist's paintbrush to delicately sweep the snowflake into the center of your viewing area.
Start at Low Magnification and Focus
Snow crystals are relatively large in the microscopic world. Begin with your lowest magnification setting (usually 20x to 40x). This provides a wide field of view, allowing you to easily locate intact crystals and lock in the optical focus before zooming in on specific branches.
How to Get Clear Snowflake Images
Adjust Lighting and Background
Because ice is completely transparent, direct bottom lighting will wash it out. Use angled top lighting (incident light) against a dark background to cast tiny shadows across the facets of the ice. This highlights the ridges, trapped air bubbles, and complex surface geometry.
Keep Snowflakes Cold and Work Quickly
You cannot bring snow inside a heated house or laboratory to view it. You must set up your microscope outside, in an unheated garage, or on a freezing porch. Even in a cold environment, the heat generated by the microscope's LED lights will eventually degrade the specimen.
Capture Photos Before Crystals Change
Ice undergoes continuous sublimation, slowly turning back into vapor even when completely frozen. The sharp, jagged edges of a freshly fallen snowflake will begin to round off and dull within minutes. Snap your photographs immediately after focusing.
Choosing a Microscope for Snow
Match Magnification to Your Observation Goal
You do not need 1000x magnification to enjoy snow. A range between 20x and 100x is ideal for seeing the full crystal structure. Compound biological microscopes are difficult to use because their high-power lenses sit too close to the sample and trap heat.
Check Focus, Lighting, and Image Capture
A digital inspection microscope is the absolute best tool for this task. The TOMLOV DM602 Pro 10.1 Inch HDMI Digital Microscope features a massive built-in IPS screen, eliminating the need to squint through cold eyepieces outdoors. Its adjustable ring light allows you to dial in the perfect contrast, and you can capture high-resolution photos with a single button press before the crystal melts.
Final Thoughts
Photographing snow under a microscope merges science with fleeting, natural art. By understanding the atmospheric physics that shape these crystals and mastering cold-weather observation techniques, you can capture breathtaking geometric images of a hidden winter world.
Frequently Asked Questions
Can You See Snowflakes With a Digital Microscope?
Yes, a top-down digital microscope is actually the preferred tool for viewing snow. The digital screen allows for quick, comfortable viewing in freezing temperatures, and the integrated camera lets you instantly document the crystal before it sublimates.
What Magnification Is Best for Viewing Snowflakes?
An optical magnification between 20x and 100x is optimal. This range is powerful enough to reveal the intricate surface patterns and hexagonal symmetry of the ice without sacrificing the field of view or placing the warm lens too close to the specimen.
Why Do Snowflakes Melt Under a Microscope?
Snowflakes melt primarily due to radiant heat emitted by the microscope's LED lighting system, combined with ambient heat if the instrument is not thoroughly pre-chilled. Even the heat radiating from your face near the eyepieces can destroy delicate crystals.
What Magnification Is Best for Viewing Snowflakes?
While 20x to 100x is perfect for viewing the whole structure, going beyond 200x often requires specialized cold-stage equipment. Pushing digital zoom too high on a frozen subject usually results in pixelation rather than revealing new structural detail.
Why Do Snowflakes Melt Under a Microscope?
In addition to direct heat, snow crystals also undergo rapid sublimation when exposed to dry air, transitioning directly from solid ice to water vapor. This causes the sharp edges of the snowflake to dull and round off rapidly, mimicking a melting effect.



Commenta
Nota che i commenti devono essere approvati prima di essere pubblicati.
Questo sito è protetto da hCaptcha e applica le Norme sulla privacy e i Termini di servizio di hCaptcha.