Table of Contents
A microscope can magnify tiny details, but magnification alone does not create a clear image. Light control is just as important. That is where the diaphragm comes in. The diaphragm on a microscope controls how much light passes through the specimen and reaches the lens system. By adjusting it, you can make the image brighter, darker, sharper, or more detailed. This small part is especially useful when viewing thin, transparent samples like plant cells, pond water, tissue slides, or microorganisms. If too much light enters the microscope, the image may look washed out. If too little light enters, the image may look dark and unclear. Understanding how the diaphragm works helps students, hobbyists, and beginners get better results without guessing. In this guide, we will explain what the microscope diaphragm does, how to adjust it, and why it matters for clear viewing.
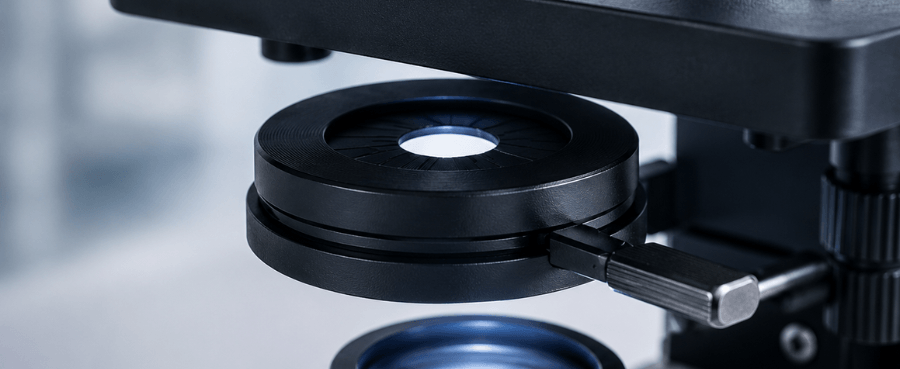
What Is a Microscope Diaphragm?
The diaphragm is a light control part located under the stage of a compound microscope. The stage is the flat platform where the slide sits. Light usually comes from a built-in lamp or mirror below the stage, passes through the diaphragm, travels through the specimen, and then enters the objective lens.
The diaphragm does not magnify the specimen. Instead, it controls the amount and shape of light that reaches the slide. This directly affects how much contrast and detail you can see.
Where Is the Diaphragm Located?
On most compound microscopes, the diaphragm is found just below the stage and above the light source. Depending on the microscope design, it may sit close to the condenser, which is another optical part that focuses light onto the specimen.
If you look under the stage, you may see a small rotating disc, a lever, or a ring with an adjustable opening. That is usually the diaphragm control.
Why Beginners Often Overlook It
Many beginners focus only on the eyepiece, objective lenses, and focus knobs. That makes sense because those parts are easy to notice. However, the diaphragm can make a major difference in image quality.
A blurry or low-contrast image is not always a focusing problem. Sometimes the microscope is focused correctly, but the light is not adjusted well. Learning to use the diaphragm can solve many common viewing problems.
What Is the Function of the Diaphragm on a Microscope?
The main function of the diaphragm on a microscope is to control the amount of light passing through the specimen. This helps improve brightness, contrast, and image clarity.
When you open the diaphragm, more light reaches the slide. When you close it, less light reaches the slide. This simple adjustment changes how the specimen appears through the eyepiece.
It Controls Brightness
The most obvious function of the diaphragm is brightness control. If the image looks too dark, opening the diaphragm allows more light to pass through. If the image looks too bright, closing the diaphragm reduces the amount of light.
This is useful because different specimens need different lighting. A thick or stained slide may need more light. A very thin or transparent slide may need less light to show detail.
It Improves Contrast
Contrast is the difference between light and dark areas in an image. Good contrast helps you see cell walls, edges, fibers, bubbles, and small internal structures.
Too much light can reduce contrast. The image may look bright, but the important details may disappear. By closing the diaphragm slightly, you can make those details stand out more clearly.
It Helps Reveal Fine Details
The diaphragm also affects how much fine detail you can see. With the right light setting, small structures become easier to identify. This is especially important when looking at transparent specimens such as onion skin cells, cheek cells, algae, or pond water organisms.
A small adjustment can turn a flat, pale image into one with visible outlines and texture.

How the Diaphragm Affects Image Quality
A microscope image depends on a balance between light, contrast, focus, and magnification. The diaphragm plays a role in that balance.
Opening or closing the diaphragm does not simply make the image brighter or darker. It also affects how the light interacts with the specimen.
Too Much Light Can Wash Out the Image
When the diaphragm is fully open, a large amount of light passes through the slide. This can be helpful at higher magnifications, but it can also create problems.
If the specimen is thin or nearly transparent, too much light may make it hard to see. The image can look pale, flat, or washed out. You may feel like the microscope is not focused, even when it actually is.
In this case, closing the diaphragm slightly can improve the view.
Too Little Light Can Hide Details
If the diaphragm is closed too much, the image may become too dark. You may see shadows, uneven lighting, or a narrow field of view. Fine structures may disappear because there is not enough light reaching the objective lens.
This is why the diaphragm should not always be kept nearly closed. The best setting depends on the specimen and magnification level.
The Best Setting Is Usually a Middle Ground
For most beginner microscope work, the best diaphragm setting is not fully open or fully closed. A middle setting often gives the best balance of brightness and contrast.
The goal is to make the specimen bright enough to see, but not so bright that the details disappear.
Types of Microscope Diaphragms
Not all microscopes use the same type of diaphragm. The two most common types are the disc diaphragm and the iris diaphragm.
Disc Diaphragm
A disc diaphragm is a rotating plate with several holes of different sizes. To adjust the light, you rotate the disc until one of the holes lines up with the light path.
Larger holes allow more light through. Smaller holes allow less light through.
Disc diaphragms are common on basic student microscopes because they are simple, durable, and easy to use. However, they offer fewer adjustment options compared with iris diaphragms.
Iris Diaphragm
An iris diaphragm uses overlapping metal blades that open and close smoothly, similar to the aperture inside a camera lens. It usually has a small lever that lets you adjust the opening gradually.
This type gives more precise control over light. Instead of choosing from a few fixed hole sizes, you can fine-tune the light level.
Iris diaphragms are often found on more advanced compound microscopes.
Which Type Is Better?
For basic classroom use, a disc diaphragm is usually enough. It can help beginners understand how light affects image quality.
For more detailed observation, an iris diaphragm is better because it gives smoother and more accurate control. This is useful when viewing cells, microorganisms, stained slides, or delicate transparent samples.
How to Adjust the Diaphragm Correctly
Using the diaphragm is not complicated, but it does take a little practice. The key is to adjust it after you have placed and focused the slide.
Start With Low Magnification
Always begin with the lowest-power objective lens. This gives you a wider view and makes it easier to find the specimen.
Place the slide on the stage, turn on the light, and use the coarse adjustment knob to bring the specimen into focus. Then use the fine adjustment knob to sharpen the image.
Once the specimen is visible, adjust the diaphragm.
Adjust the Light Slowly
Move the diaphragm control slowly while looking through the eyepiece. Watch how the image changes.
If the image is too bright, close the diaphragm slightly. If the image is too dark, open it gradually. Stop when the details look clear and the image feels comfortable to view.
Do not assume the brightest setting is the best. In microscopy, brighter does not always mean clearer.
Readjust When You Change Magnification
Each objective lens may need a different diaphragm setting. Low magnification usually needs less light. High magnification often needs more light because the lens collects a smaller amount of light.
After switching to a higher-power objective, check the brightness again. You may need to open the diaphragm more to maintain a clear image.
Diaphragm vs. Condenser: What Is the Difference?
The diaphragm and condenser work together, but they are not the same part.
The diaphragm controls how much light passes through. The condenser focuses that light onto the specimen.
The Diaphragm Controls Light Amount
Think of the diaphragm as the part that decides how wide the light opening should be. A wider opening means more light. A smaller opening means less light.
This affects brightness and contrast.
The Condenser Focuses the Light
The condenser gathers and directs light toward the slide. On some microscopes, the condenser can be moved up or down to improve illumination.
More advanced microscopes often allow both condenser and diaphragm adjustments. This gives users greater control over image quality.
Why Both Matter
If the condenser is poorly positioned, the light may not be evenly focused on the specimen. If the diaphragm is poorly adjusted, the image may be too bright, too dark, or low in contrast.
Good microscopy depends on both proper focus and proper light control.

When Should You Open or Close the Diaphragm?
The right diaphragm setting depends on what you are viewing and what magnification you are using.
Use a More Open Diaphragm for Higher Magnification
High-power objective lenses usually need more light. When you switch from 10x to 40x, the image often becomes darker. Opening the diaphragm can help restore brightness.
This is especially important when viewing stained slides or thicker specimens.
Use a More Closed Diaphragm for Transparent Samples
Thin and transparent samples can be difficult to see under bright light. Closing the diaphragm slightly can improve contrast and make edges easier to detect.
This is useful for onion cells, cheek cells, pond water, and other lightly colored specimens.
Adjust Based on the Image, Not a Fixed Rule
There is no single perfect diaphragm setting for every slide. The best approach is to watch the image while adjusting. If details become clearer, you are moving in the right direction. If the image becomes too dark or flat, adjust again.
Common Mistakes When Using the Microscope Diaphragm
Many microscope problems come from simple light control mistakes. These are easy to fix once you know what to look for.
Keeping the Diaphragm Fully Open All the Time
This is one of the most common beginner mistakes. A fully open diaphragm may seem helpful because it makes the image bright, but it can reduce contrast.
If you cannot see detail in a clear specimen, try closing the diaphragm slightly.
Closing the Diaphragm Too Much
Closing the diaphragm too far can make the image dark and difficult to view. It may also create harsh shadows or make the field of view uneven.
If you feel like the specimen disappears when you adjust the diaphragm, open it back up slowly.
Trying to Fix Lighting Problems With the Focus Knob
If the image is unclear, beginners often keep turning the focus knobs. But focus is only one part of image quality.
If the specimen is already focused but still hard to see, adjust the diaphragm before changing the slide or objective.
Why the Diaphragm Matters for Students and Hobbyists
The diaphragm is especially important for beginners because it teaches one of the most practical microscopy skills: how to control light.
A microscope is not just a magnifying tool. It is an optical system. The way light passes through the specimen affects what you can see.
It Makes Learning Easier
Students often get frustrated when they cannot find or identify structures on a slide. Better diaphragm control can make the viewing experience smoother.
Instead of guessing whether the slide is wrong or the microscope is broken, students can adjust the light and improve the image.
It Helps Build Better Observation Skills
When you adjust the diaphragm, you learn how different samples respond to light. Some need bright illumination. Others show more detail with reduced light.
This helps users become more confident and accurate when observing specimens.
It Supports Better Results With Modern Microscopes
Many modern microscopes include built-in lighting, camera connections, or screen-based viewing. If you are comparing traditional viewing with a Digital microscope, it is still important to understand light control. Digital models may display the image on a screen, but brightness, contrast, and sample visibility still depend heavily on proper illumination.
Related Reading: What Is A Digital Microscope And How Does It Work?
How to Know If Your Diaphragm Is Set Correctly
A good diaphragm setting should make the specimen easy to see without eye strain. The image should not be painfully bright, too dim, or lacking detail.
Look for Clear Edges
If you are viewing cells, fibers, or small organisms, the edges should appear reasonably clear. If the edges fade into the background, reduce the light slightly.
Check the Background
The background should be bright enough to see through, but not so bright that it overwhelms the specimen. A balanced background usually gives a more comfortable viewing experience.
Make Small Adjustments
Small changes often work better than large ones. Move the diaphragm a little at a time and give your eyes a second to adjust.
Final Thoughts
The diaphragm on a microscope may look like a small and simple part, but it has a major effect on what you see. Its main function is to control the amount of light passing through the specimen, which directly affects brightness, contrast, and detail. If the image looks washed out, the diaphragm may be too open. If the image looks dark, it may be too closed. Once you learn how to adjust it, microscope viewing becomes much easier and more accurate. Whether you are a student looking at cells, a hobbyist studying pond water, or a beginner learning basic lab skills, the diaphragm helps you get clearer results. The best approach is simple: focus the specimen first, adjust the diaphragm slowly, and choose the setting that reveals the most useful detail.


Commenta
Nota che i commenti devono essere approvati prima di essere pubblicati.
Questo sito è protetto da hCaptcha e applica le Norme sulla privacy e i Termini di servizio di hCaptcha.