
Table of Contents
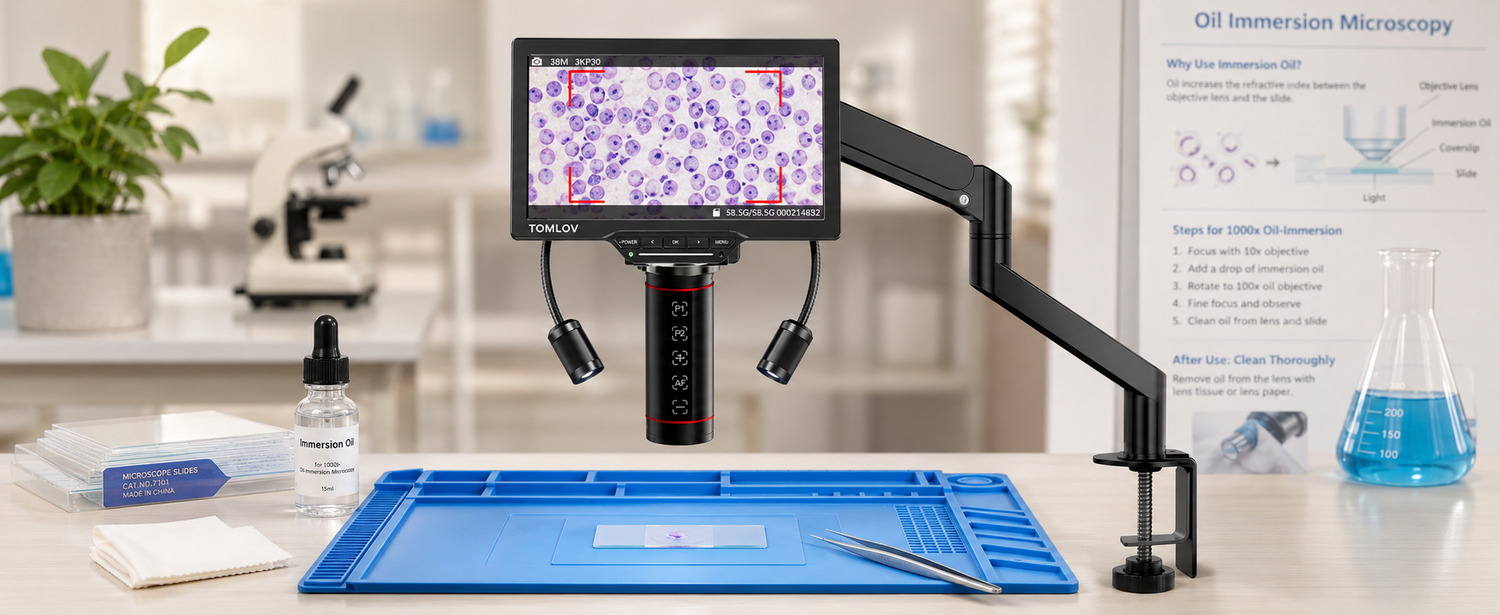
Immersion oil is a clear, viscous fluid you place between the coverslip and a 100x objective lens to bridge the air gap that would otherwise scatter light and blur the image. You need it whenever you're working at 1000x total magnification — viewing bacteria, blood smears, or fine cellular structures — because at that range, air refraction alone is enough to wreck resolution. Used correctly, it takes about ten seconds to apply and turns a fuzzy image into a sharp one.
What Is Microscope Immersion Oil?
Immersion oil is a specialized optical fluid with a refractive index of roughly 1.515 — almost identical to that of glass. That match is the whole point. When light passes from the coverslip into air and then into the objective lens, it bends at each boundary because the refractive indices don't agree. Replacing that air gap with oil of the same refractive index as glass effectively turns the coverslip, oil, and front lens into a single continuous optical medium.
Early microscopists used cedarwood oil, which worked but yellowed over time and damaged lens coatings if left too long. Modern oils are synthetic, non-drying, and formulated to stay clear for years. They come in small dropper bottles and a single bottle lasts most home users a very long time.
Why Does Immersion Oil Improve Resolution?
Skipping the oil on a 100x oil objective causes several problems, none of them good. Light rays leaving the coverslip bend sharply at the air gap, and many of the steepest rays never reach the objective. Resolution drops, and the image looks soft no matter how carefully you focus. Contrast also falls because scattered light washes out the difference between the specimen and its background, leaving everything in a hazy gray middle ground. On some high-NA objectives, the working distance is so short that the front lens can actually touch a dry coverslip and scratch its coating, which is permanent damage to an expensive lens. The objective is engineered to work submerged in oil, so running it dry defeats both its optical design and the physical clearances it relies on.
When Should You Use Immersion Oil?
Using a 100x Oil-Immersion Objective
Any objective with "oil" or "HI" (homogeneous immersion) engraved on the barrel — almost always the 100x — requires oil. Using it dry isn't a shortcut; it's a guaranteed bad image. If you find yourself working at this magnification often, investing in the digital microscope you can afford with a proper oil-rated 100x objective pays off quickly in image quality.
Viewing Bacteria, Blood Smears, and Fine Cell Details
Oil immersion is the standard for resolving anything close to the diffraction limit of visible light — roughly 0.2 micrometers. That includes bacterial morphology in a Gram-stained smear, the granules inside white blood cells, chromosomes during mitosis, and the fine internal organelles of larger cells. Anything you can see clearly at 400x will look noticeably crisper at 1000x with oil.
Situations Where You Should Skip the Oil
Lower-power objectives (4x, 10x, 40x) are designed to work in air. Putting oil on them contaminates the lens and contributes nothing optically. Stereo and dissecting microscopes don't use immersion oil at all. Hair, insects, coins, circuit boards, and most opaque specimens are viewed dry under reflected light, and oil would just make a mess.

Which Type of Immersion Oil Is Right for You?
Type A for Routine Microscopy
Type A is the standard low-viscosity oil — thin enough to apply easily, suitable for general lab and educational use. It's what comes with most starter kits and what you'll reach for 90% of the time.
Type B for Extended Viewing Sessions
Type B is thicker. The higher viscosity keeps the oil from drifting off the slide during long observations or when you're moving the stage frequently. Pathologists scanning many fields on a single slide often prefer it.
Low-Viscosity Oils for Heated Stages
Live-cell imaging at 37°C requires an oil formulated to keep its refractive index stable as it warms. Standard oils thin out and change index at higher temperatures, which throws off the optical correction.
Specialty Oils for Fluorescence Microscopy
Fluorescence work needs oil with very low autofluorescence — meaning the oil itself doesn't glow under UV or blue excitation. Standard oil can fluoresce enough to swamp a weak signal, so dedicated low-fluorescence formulations exist for this purpose.
|
Oil Type |
Viscosity |
Best For |
|
Type A |
Low |
General use, education |
|
Type B |
High |
Long sessions, slide scanning |
|
Low-temp stable |
Variable |
Live-cell imaging |
|
Low-fluorescence |
Low |
Fluorescence microscopy |
How Do You Use Immersion Oil Step by Step?
Check That Your Objective Is Oil Rated
Read the engraving on the barrel. If it says "oil" or "HI," you're good. If it says nothing, or says "dry," do not apply oil. Mixing this up is the most common beginner mistake.
Focus First with a Lower-Power Lens
Locate your specimen at 10x or 40x and bring it into sharp focus. This positions the slide correctly so you only need fine adjustments once the oil objective is in place. Skipping this step almost always means hunting blindly through oil at 100x, which wastes time and risks crashing the lens into the slide. If your scope has fine motorized control, an Auto Focus Microscope saves a lot of fiddling at this stage by tracking focus as you move across the field.
Apply a Single Drop of Oil
Rotate the nosepiece so no objective is over the slide. Place one drop of oil directly on the coverslip above your specimen. One drop is enough — more just spreads onto neighboring areas and creates cleanup work later.
Rotate the Oil Objective into Place and Fine Focus
Swing the 100x objective gently into position. The front lens should make contact with the oil — you'll see the drop wet the lens. Use only the fine focus knob from this point. Coarse focus at 100x risks driving the lens through the coverslip.

How Do You Clean Your Lens After Using Oil?
Recommended Cleaning Materials
Use lens tissue or a clean microfiber cloth — never paper towels or tissues, which scratch coatings. For stubborn residue, lens cleaning solution or a small amount of pure xylene works, applied to the tissue rather than directly on the lens. Wipe in a single direction, not a circular scrub.
Preventing Oil Residue Buildup
Clean the objective immediately after every session. Dried oil hardens within hours, becomes much harder to remove later, and can eventually creep into the lens housing and damage the cement holding the optical elements together. A 30-second wipe at the end of each session prevents the multi-hour cleaning jobs that come from putting it off. This habit matters more the better your equipment gets: on a precision instrument like the tomlov digital microscope, the objective lenses are the single most expensive component, and consistent cleaning is what keeps the optics performing the way they did on day one.
What Mistakes Should You Avoid?
Don't use oil on dry objectives — it contaminates them and degrades the image. Don't switch from oil to dry objectives without cleaning in between, since trace oil on a 40x lens distorts its optics. Don't leave oil on the lens overnight, as it can creep into the lens housing. Don't substitute cooking oil, mineral oil, or any other "clear fluid" — refractive index matters, and household oils don't match glass. And don't apply so much oil that it pools on the stage or runs under the slide.
Conclusion
Immersion oil is one of those small accessories that quietly determines whether your high-magnification work looks professional or amateur. Use the right type, apply one drop, and clean up afterward — that's the entire workflow. Once you've seen the same specimen with and without oil at 1000x, you won't go back. The difference in resolution and contrast is immediate and unmistakable, and the technique itself is simple enough to become second nature within a few sessions.
FAQs
What is immersion oil and when and why would it be used?
Immersion oil is a clear fluid with a refractive index matching glass (~1.515). It's placed between the coverslip and a 100x oil-immersion objective to eliminate light scattering at the air gap, used whenever you need maximum resolution for bacteria or fine cellular detail.
What happens if you don't use immersion oil?
The image turns blurry and low-contrast because light rays bend at the glass-air boundary and many never enter the objective. You lose resolution, can't reach the lens's rated numerical aperture, and risk scratching the front lens against a dry coverslip.
How to use immersion oil on a microscope?
Focus your specimen at lower power first, swing the nosepiece away, place one drop of oil on the coverslip, then rotate the 100x oil objective into position so it contacts the drop. Use only fine focus, then clean the lens with lens tissue afterward.
Why is immersion oil used for 100x?
The 100x objective has a numerical aperture above 1.0, which requires a medium denser than air between specimen and lens. Oil matches the refractive index of glass and lets the lens deliver its full rated resolution — air physically cannot.

发表评论
所有评论在发布前都会经过审核。
此站点受 hCaptcha 保护,并且 hCaptcha 隐私政策和服务条款适用。