Buying your first digital microscope can be a daunting task. There are numerous models on the market, each with distinct screen sizes, magnification levels, and features. The product pages often use technical jargon or inflated numbers, making it even harder for beginners to discern what really matters.
But here’s the good news: choosing the right microscope doesn’t have to be stressful. Once you understand the basics — what a digital microscope is, how to match it to your needs, and which features are worth paying for — you’ll be able to make a confident decision. This guide will walk you through everything step by step, from screen sizes and magnification to budget tips and common mistakes to avoid.
Understand What A Digital Microscope Is
Digital Vs. Traditional Optical Microscopes
Traditional microscopes rely on eyepieces. You bend over, squint, and focus directly through the lenses. Digital microscopes replace that experience with a built-in display or connection to a computer. Instead of leaning into an eyepiece, you see everything projected on a screen.
This difference makes digital microscopes far more beginner-friendly. They reduce eye strain, are easier to operate, and often let you capture images or videos with a single click. That means you can document your findings, save them for later, or share them instantly.
Tip:If you plan to share what you’re looking at with family members, students, or hobby groups, a digital microscope is the smarter choice.
Related Reading:Digital vs. Optical Microscopes: An In-Depth Comparison
Key Benefits Of Digital Microscopes
-
Easy to use: Most are plug-and-play, with minimal setup required.
-
Great for group viewing: A screen lets several people see the same thing at once.
-
Portable: Many models are lightweight and can be used anywhere.
Tip:Think about where you’ll use it most. For casual hobbies on the go, opt for a compact model with built-in battery power. For longer desk sessions, a larger screen and stable stand are worth the investment.

Identify Your Main Use Case
Coins And Stamps
Collectors need to spot scratches, mint marks, and tiny paper fibers. For this purpose, a digital microscope with 200x–500x magnification and bright adjustable LED lights works best. A 7-inch digital microscope provides ample viewing comfort without occupying excessive space.
Tip:Pick a model with an SD card slot so you can easily save images of your collection.
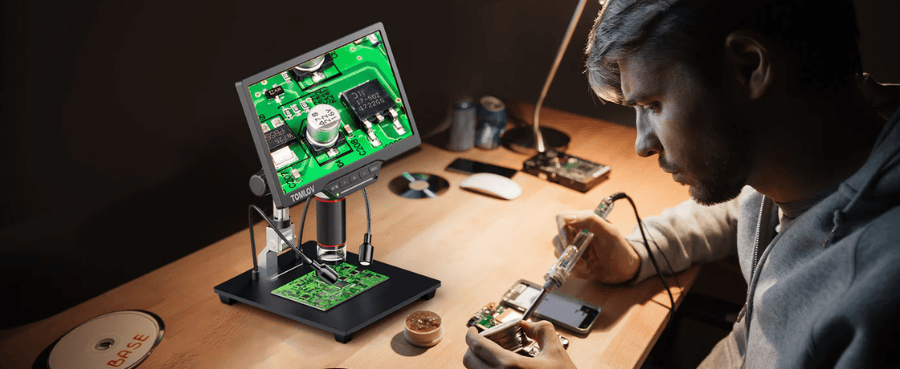
Electronics And Soldering
If you work on circuit boards, you’ll need a wide stand and enough working distance so your hands and tools fit comfortably under the lens. Here you could write: “For tasks like soldering, using an HDMI digital microscope makes it easier to see fine details on a bigger display.”
👉 Tip: Measure your largest circuit board before buying to make sure the stand height is sufficient.
Education And Teaching
For classrooms, bigger is better. A 10-inch screen or a model with HDMI/PC connectivity allows you to project images for group viewing. Real-time video output ensures smooth, interactive lessons.
👉 Tip: Choose a microscope that supports live video streaming if you plan to demonstrate experiments.
Biology And Insects
Examining magnification of 500x or higher for insect wings or plant cells requires a higher magnification of 500x or higher and a stable stand with fine focus control. Adjustable stands make it easier to switch between different sample sizes.
👉 Tip: Make sure your microscope has precise focusing knobs. They make a big difference when viewing thin or transparent samples.
Decide On The Right Screen Size
4.3-Inch Models
4.3 Inch Digital microscopes are small, lightweight, and inexpensive. They’re great for kids or quick inspections, but can cause eye strain during long sessions
👉 Tip: Stick to short sessions with a 4.3-inch model. For anything longer than 15–20 minutes, you’ll want a larger screen.
7-Inch Models
The most popular option for beginners. A 7-inch screen strikes the right balance between comfort and price. It’s ideal for coin collectors, hobbyists, and general electronics work.
👉 Tip: If this is your first microscope, a 7-inch model is often the safest and most versatile choice.
10-Inch Models
Bigger screens make long sessions easier on the eyes and are excellent for teaching or professional work. They occupy more desk space and are more expensive, but offer unbeatable viewing comfort.
👉 Tip: If you’ll use your microscope for workshops, classrooms, or detailed inspections, invest in a 10-inch display.

Understand Magnification And Image Quality
Don’t Fall For Big Numbers
Many microscopes advertise “1000x” or “1200x” magnification. In reality, many of these are just digital zoom, which enlarges the image but doesn’t improve clarity. The result? Blurry, pixelated pictures.
👉 Tip: Always check product listings for authentic sample images or demo videos. If none are shown, that’s a warning sign.
What Magnification Do You Need?
-
200x–500x: Enough for coins, stamps, and casual hobbies.
-
500x–1000x: Needed for soldering, insect wings, and biology samples.
👉 Tip: Match magnification to your purpose. If you just need to spot scratches on coins, a magnification of 200x–500x is plenty. If you want to explore tiny cell details, aim for a magnification of 500x–1000x.
Balance Budget And Performance
Under $100
Entry-level microscopes at this price are great for kids or casual users. Expect smaller screens and basic features.
$100–$200
This is the ideal starting point for most beginners. In this range, you’ll find larger screens, improved lighting, and more sturdy stands.
$200+
At this level, you’ll get professional or educational quality. Expect higher resolution, HDMI output, and durable build quality.
👉 Tip: Don’t just choose the cheapest model. Spending a little more often gives you much better clarity and stability.
Check Connectivity Options
USB And SD Card
These let you save and share images. Perfect for casual inspection and documentation.
HDMI Output
If you’re teaching, soldering live, or want group viewing, HDMI output is a game-changer.
👉 Tip: Think about how you’ll use your microscope. If you only need to capture images, USB or SD card support is enough. If you need to share live views, prioritize HDMI.
Practical Setup And Durability
LED Lighting
Adjustable brightness is particularly important for reflective objects, such as coins.
Stands And Working Distance
Choose a sturdy stand that doesn’t wobble. A wide working distance is key for soldering and handling larger objects.
Ease Of Use & Durability
Look for plug-and-play microscopes with simple menus. Avoid flimsy stands or weak hinges that wear out quickly.
👉 Tip: Always check warranty and brand support. This ensures peace of mind if something breaks.
Consider Brand & Support
Many beginners overlook brand reliability, but it matters. Trusted brands like Tomlov, Celestron, and Plugable provide warranties, clear manuals, and responsive customer service. These details make a significant difference for first-time buyers who may require additional guidance.
👉 Tip: Pick a brand that offers a return policy. It reduces risk and makes your first purchase stress-free.
Avoid Common Beginner Mistakes (Checklist)
-
❌ Don’t buy just because of “1200x magnification.”
-
❌ Don’t pick too small a screen if you’ll use it often.
-
❌ Don’t forget to check connectivity options.
- ❌ Don’t underestimate the importance of lighting and stability.
- ❌ Don’t ignore hidden costs like SD cards, HDMI cables, or extra lighting..
Frequently Asked Questions
Q: Is a 4.3-inch digital microscope too small for beginners?
A: It’s fine for casual use, but most adults prefer a 7-inch or larger screen for comfort.
Q: Do I need HDMI output?
A: Only if you want to share images live on bigger screens. For solo use, a USB or an SD card is usually enough.
Q: How much should I spend?
A: Around $100–$200 is the sweet spot for beginners. It balances affordability with quality.
Q: Can one microscope work for coins, soldering, and insects?
A: Yes, but make sure it has adjustable stands, a wide working distance, and at least 500x usable magnification.
Conclusion
Choosing your first digital microscope doesn’t have to be overwhelming. Start by identifying your main use case, deciding on the right screen size, and focusing on clarity rather than inflated magnification numbers. Set a budget that matches your needs, and don’t forget to check for good lighting, stability, and brand support.
Beginner-friendly brands like Tomlov make the process easier by offering reliable, affordable, and easy-to-use microscopes. With the right choice, your first digital microscope can open up an entirely new world of discovery.
Laisser un commentaire
Tous les commentaires sont modérés avant d'être publiés.
Ce site est protégé par hCaptcha, et la Politique de confidentialité et les Conditions de service de hCaptcha s’appliquent.