This article shows you a reliable, microscope-based method to measure hair thickness accurately, whether you’re doing a quick at-home check or a more lab-style measurement.
You’ll learn how to prep and mount a single hair on a slide, calibrate your microscope (the step most people skip), and measure the shaft diameter using an eyepiece micrometer or simple image software—plus the common mistakes that throw results off and how to get consistent readings you can trust.
Essential Equipment and Setup for Precision
You cannot measure what you cannot clearly see. Preparation is 90% of the battle.
The Microscope and Optical Tools
You generally have two paths, and your equipment dictates your method:
- The Analog Path: You need a Compound Light Microscope (uses visible light and lenses to magnify a sample), an Eyepiece Micrometer (a small glass disc with a finely etched ruler inserted into the microscope eyepiece for measuring), and a Stage Micrometer (a microscope slide with a precise scale etched onto it, used for calibration).
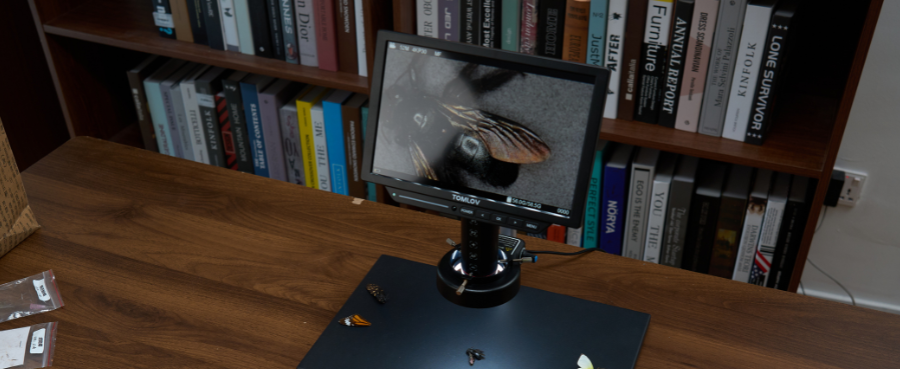
- The Digital Path: You need a **USB Microscope (a type of digital microscope that connects to a computer for real-time imaging)** or a camera attachment, and analysis software (like ImageJ, a free image analysis program, or the software provided by the microscope manufacturer).
Preparing the Sample Slide
Hair is cylindrical (shaped like a tube) and translucent (lets light pass through but not clearly), which causes light to bend (refract) around the edges, making precise measurement difficult.
-
Clean the Strand: Wipe the hair with a little rubbing alcohol to remove oil and product buildup.
-
The "Straight and Flat" Rule: Mount the hair on a glass slide. Do not just tape it down; use a cover slip.
-
Pro Tip: If you have it, use a drop of glycerin or water under the cover slip. This reduces the light refraction and gives you crisp, sharp edges (the cuticle) rather than a blurry glowing halo.

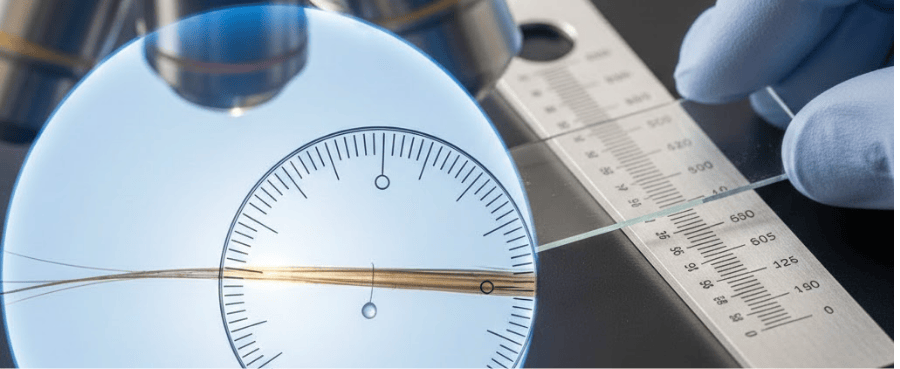
Method 1: The "Gold Standard" Reticle Measurement
In this professional laboratory method, you calibrate your microscope so the distance each eyepiece 'tick mark' represents is known, then measure the hair using this reference.
Step 1: Calibration (The Math Part)
You must do this before you put the hair on the stage.
- Insert the Reticle: Place your eyepiece micrometer (the glass disc with an etched ruler; sometimes called a reticle) into your microscope eyepiece.
- Place the Stage Micrometer: Put the calibration slide on the stage.
- Align the Lines: Look through the scope. Line up the "0" of your eyepiece ruler with the "0" of the stage slide ruler.
- Calculate the Factor: Look for where the lines match up again. If 10 units on your eyepiece (the reticle scale) equals 100 microns on the stage slide (the calibration scale), then 1 unit = 10 microns (a micron is one thousandth of a millimeter).
- Write It Down: This is your "Calibration Factor" for that specific magnification (e.g., 400x).
Step 2: Measuring the Hair
-
Swap the Slides: Remove the calibration slide and place your hair slide on the stage.
-
Focus: Bring the hair into sharp focus. You should see the edges clearly.
-
Count the Ticks: Rotate the eyepiece so the ruler lays across the width of the hair. Count how many "tick marks" wide the hair is.
-
Final Calculation: Multiply the number of ticks by your Calibration Factor.
- Example: The hair is 6 ticks wide. Your factor is 10 microns per tick.
- Result: 6 x 10 = 60 microns (Fine/Medium hair).

Method 2: The Digital Analysis Technique
Capturing and Analyzing the Image
- Capture the Reference: First, take a picture of a standard ruler (if low magnification) or a stage micrometer (if high magnification) using your digital scope. This tells the software "this many pixels = 1 millimeter."
- Capture the Hair: Without changing the focus knob or zoom level, take a picture of your hair strand.
-
Use Software (ImageJ):
- Open your reference photo. Use the "Set Scale" line tool to draw a line across the ruler and tell the software "This line is 1 mm."
- Open your hair photo. Use the line tool to draw a line across the width of the hair.
- The software will automatically calculate the diameter based on your reference scale.
Method 3: The "Field of View" Estimation (Budget Friendly)
The Comparison Technique
-
Determine FOV: Check your microscope manual. It usually lists the FOV (Field of View), which is the diameter of the circle of light you see for each lens (e.g., at 40x magnification, the FOV might be 4.5mm wide).
-
The Visual Fraction: Look at the hair. Estimate how many hairs could fit side-by-side across the center of the circle.
-
The Formula:
-
$$\text{Diameter} = \frac{\text{Field of View Diameter}}{\text{Number of Hairs that fit}}$$
- Scenario: If your FOV is 0.5mm (500 microns) and you estimate about 8 hairs would fit across the screen: $500 / 8 = 62.5$ microns.
- Note: This is an estimate, not a precise measurement. It works for a quick review but is not sufficient for scientific data.
Step-by-Step Decision Guide
| If your situation is... | Then choose this method... | Why? |
|---|---|---|
| "I need precise data for a lab report or science project." | Method 1 (Analog) | It is the most scientifically rigorous and reduces error from pixelation. |
| "I have a USB microscope connected to my laptop." | Method 2 (Digital) | Your hardware is built for this. It’s easier to click a mouse than count tiny lines. |
| "I just want a rough idea of my hair type for buying shampoo." | Method 3 (Estimation) | You don't need to know if it's 65 or 68 microns; you just need to know if it's Thin or Thick. |
| "I have a standard microscope but zero budget for extra tools." | Method 3 (Estimation) | It utilizes the physics of the lens you already own. |
Frequently Asked Questions
Should I measure my hair wet or dry?
Dry. Hair is porous (like a sponge). When it is wet, the cortex swells, and the hair can expand in diameter by up to 20-30%. For an accurate "resting state" measurement that reflects your true hair type, measure it dry.
My hair measurement changes if I rotate the strand. Why?
Hair is rarely a perfect circle. Cross-sections of hair can be oval, elliptical, or even flat (ribbon-like), especially in curly or coiled hair types. The "diameter" will look different depending on which side of the ribbon is facing up. For the best accuracy, measure several different hairs and take an average.
Where on the strand should I measure?
Avoid the very tip (which is often tapered and damaged) and the bulb (root). The most consistent measurement is usually found about 2–3 cm away from the scalp. This represents the newest, healthiest growth that hasn't been weathered by the environment.
Is a generic "ruler slide" good enough for calibration?
Yes. A 'stage micrometer' is just a fancy name for a slide with a very tiny ruler on it, used for calibration.
How do I know if my hair is "Fine" or "Coarse" based on the number?
Here is the general industry benchmark:
- 0 – 60 microns: Fine. (Prone to breakage, easily weighed down by heavy products).
- 60 – 80 microns: Medium. (The most common texture, balances strength and flexibility).
- > 80 microns: Coarse. (Strong, holds style well, but can be resistant to moisture/dye).

Final Thoughts
By determining if your hair falls into the Fine (<60µm), Medium (60–80µm), or Coarse (>80µm) category, you unlock the ability to make smarter decisions about hair care products, heat styling, and chemical treatments. Ultimately, knowing your true micron count empowers you to stop guessing and start treating your hair based on its actual structural reality.
Leave a comment
All comments are moderated before being published.
This site is protected by hCaptcha and the hCaptcha Privacy Policy and Terms of Service apply.