
Table of Contents
Understanding working distance is essential for getting the most out of your digital microscope. This guide explains how the physical space between your lens and the specimen affects focus, magnification, and lighting. You will learn to easily adjust this distance for any specific project or repair.
What Is Working Distance?
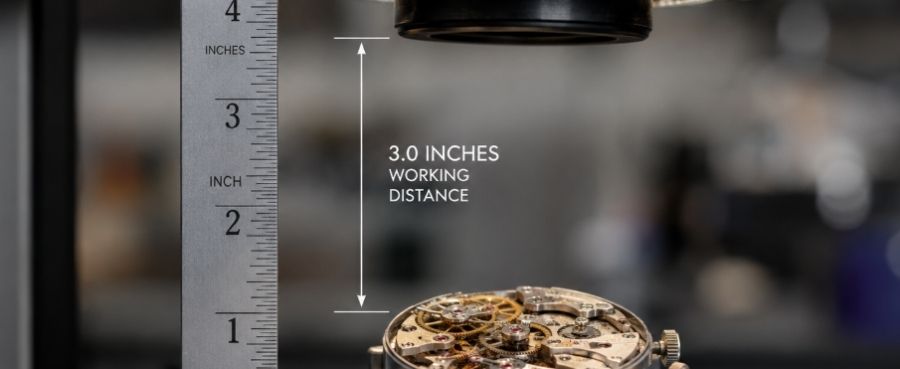
Working distance is simply the physical measurement of empty space between the bottom edge of your microscope lens and the top surface of your specimen when the image is in sharp focus. Think of it as the actual breathing room you have to maneuver under the camera. While it sounds like a highly technical optical term, it is one of the most practical and important factors determining how useful your microscope will be for your daily tasks. If you do not have the correct amount of space, you simply cannot do your work.
Why Working Distance Matters
The space beneath the lens dictates how you interact with your subject, impacting far more than just image clarity.
It Determines Whether the Object Can Focus
Every lens has a fixed focal range. If your subject sits outside this specific distance, the camera will only capture a blurry image. Placing the object at the exact designed height is essential for crystal-clear resolution.
It Controls Space Under the Lens
Examining large, tall, or irregularly shaped items requires significant vertical clearance. A microscope with a short working distance risks physically crashing into taller subjects before it can ever achieve focus.
It Affects Lighting and Tool Access
Repair and assembly work require physical room to maneuver your hands and tools (like tweezers or screwdrivers) within the viewing frame. Sufficient clearance also prevents the lens from casting dark shadows over your workspace and gives you room to properly angle external lamps.

How Magnification Affects Working Distance
Magnification and focal clearance are locked in a strict optical relationship. Understanding this balancing act helps you set realistic expectations for your equipment.
Higher Magnification Usually Requires Less Distance
As a general rule of physics, the closer you get to a subject, the larger it appears. When you zoom in to inspect microscopic details like individual plant cells or tiny surface scratches, the lens must sit extremely close to the material. At maximum magnification, your camera housing might hover mere millimeters away from the surface of your sample.
Lower Magnification Provides More Working Space
When you zoom out to view an entire object, the lens must move higher up on the metal stand. Lower magnification levels naturally grant you a much wider field of view and significantly more vertical room. This setup is ideal when you need to understand the overall context of a piece or when you require maximum physical space for your hands.
Magnification Can Change When Distance Changes
Unlike traditional compound microscopes with fixed objective lenses, many digital microscopes feature a variable focus ring. When you physically raise the camera unit higher up the stand, you must adjust the focus ring to compensate. This action simultaneously lowers your overall magnification and widens your field of view. Mastering this dynamic relationship allows you to customize your viewing frame perfectly.
Choosing the Right Working Distance
Different hobbies and professions require vastly different equipment setups. Selecting the correct clearance depends entirely on what you plan to place on the viewing stage.
Prepared Slides and Flat Samples
If you are looking at biological samples, blood smears, or thin onion skin pressed between glass slides, you do not need much vertical room. Because the samples are perfectly flat and you do not need to manipulate them with tools while viewing, a setup with a very tight focal clearance works perfectly.
Coins, Insects, and Small Objects
Collectors inspecting rare coins, stamps, or pinned insects need a moderate amount of space. You need enough room to pick the object up with tongs and rotate it to check the edges without hitting the camera. A medium height provides excellent magnification while leaving just enough room to bounce angled light across the surface to reveal textures.
Circuit Boards and Repair Work
Soldering electronics or repairing fine jewelry demands maximum clearance. You must have ample room to hold a hot soldering iron, feed wire, and manipulate tweezers simultaneously. If your clearance is too tight, you risk melting the plastic camera housing with your heating tools. A tall stand designed for industrial repair work is absolutely mandatory for these tasks.
For circuit board inspection and soldering, working distance should provide enough room for tweezers, a soldering iron, and adjustable lighting without forcing the lens too close to the components. A flexible stand is also useful because populated PCBs often contain parts at different heights.
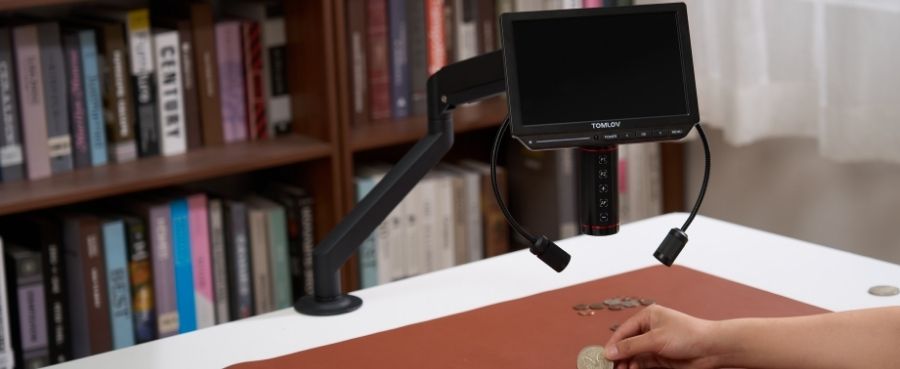
TOMLOV Autofocus 4K Digital Microscope is designed for this type of hands-on inspection. Its adjustable flex arm allows users to reposition the microscope above different areas of a circuit board, while autofocus helps restore a clear view after the board or lens position changes. The P1 and P2 preset focus points can also make it easier to switch between components at different heights. Adjustable gooseneck lights provide more control over illumination when tools or raised components create shadows. When choosing a microscope for electronics repair, compare its available tool clearance, stand stability, focusing method, and lighting setup at the magnification you actually plan to use.

How to Set the Working Distance
Properly setting up your digital microscope prevents frustration and ensures you capture the sharpest images possible. Follow a consistent routine every time you sit down to work.
Start With Low Magnification
Always begin your viewing session using the lowest optical power available on your device. Zooming out provides a wide viewing window, making it incredibly easy to locate your specimen and place it dead center on the monitor.
Adjust the Stand Height
Use the rack and pinion knobs on your vertical stand to physically raise or lower the entire camera housing. Place your object on the base and adjust the height until you have enough room for your tools and proper lighting. Lock the stand firmly in place once you achieve a comfortable height.
Fine-Tune the Focus
With the camera locked at your desired height, slowly turn the main focus dial located on the microscope body. Turn it gently until the blurry shapes on your screen sharpen into crisp, high-definition details.
Check the Available Clearance
Before you begin working, perform a quick physical check. Slide your tweezers, soldering iron, or inspection picks underneath the lens. Ensure you have a comfortable range of motion and that your hands do not block the light source or bump the camera.
Increase Magnification Gradually
If you need a closer look at a specific defect, slowly increase the magnification dial. As you zoom in, you will likely need to lower the stand slightly and readjust your fine focus. Make these adjustments gradually so you do not lose your place on the specimen.
Frequently Asked Questions
How to calculate the working distance?
You typically do not need to perform complex math to find this measurement. Most manufacturers list the exact focal range clearly in the product manual or online specifications. If you need a specific number for your current setup, simply bring an object into sharp focus and measure the empty space between the lens and the object with a standard ruler.
What is the smallest working distance?
On high powered biological scopes capable of one thousand times magnification, the clearance can be as tiny as a fraction of a single millimeter. At these extreme levels, the glass lens almost touches the sample, which is why operators must use ultra thin glass cover slips to protect the equipment from accidental scratches.
What is objective working distance?
This term refers to the specific physical clearance built into a single, interchangeable objective lens. Traditional microscopes use a rotating nosepiece with multiple lenses. Each lens has its own fixed working distance printed right on the metal barrel, meaning the clearance changes completely every time you rotate to a new optical power.
How to measure working distance microscope?
The most accurate way to measure your current setup is to place a flat calibration ruler under the camera and bring it into perfect focus. Once the image is sharp, take a second ruler and hold it vertically next to the microscope. Measure the physical gap starting from the lowest protruding plastic edge of the camera down to the surface of the calibration ruler.
What Working Distance Is Best for Soldering?
Electronic repair and micro soldering require substantial room to work safely. You should aim for a minimum of four to six inches of clearance between the lens and the circuit board. This gap ensures your hot iron has plenty of maneuvering room and protects the delicate digital camera sensor from rising chemical smoke and intense heat.
Conclusion
Mastering your digital microscope working distance transforms a frustrating process into a smooth, professional workflow. By understanding the direct relationship between magnification and physical space, you can customize your setup for any specific task. Whether you are inspecting a flat glass slide, rotating a rare coin, or soldering a complex circuit board, having the correct vertical clearance ensures your images remain sharp and your hands have the room they need to work efficiently.


Leave a comment
All comments are moderated before being published.
This site is protected by hCaptcha and the hCaptcha Privacy Policy and Terms of Service apply.