
Table of Contents
Handheld digital microscopes offer a highly portable way to explore magnified details without being tied to a bulky laboratory bench. This guide explains how these compact optical devices work, covers common practical applications, and details the steps to capture crystal-clear images.
What Is a Handheld Digital Microscope?
A handheld digital microscope is a compact, portable optical device you can hold in the palm of your hand. It replaces the traditional optical eyepieces of a standard microscope with a digital camera sensor, making magnification highly accessible and easy to share.
How a Handheld Digital Microscope Works
These devices function by gathering light through a primary objective lens situated at the tip of the barrel. Instead of directing that light up a tube to your eye, the lens focuses the light directly onto a tiny internal CMOS camera sensor. The internal processor translates this optical data into a high-definition video feed, which is then transmitted to a digital screen for viewing.
Main Parts of a Handheld Digital Microscope
Despite their small size, these instruments pack several critical components into a single cylindrical housing. The primary parts include the objective lens, an integrated LED ring light to illuminate the subject, a textured manual focus wheel on the barrel, the internal digital sensor, and an output mechanism—such as a USB cable, a WiFi transmitter, or an attached viewing screen.
How It Differs From a Traditional Microscope
Traditional compound and stereo microscopes are large, heavy benchtop instruments. They require the specimen to be brought to the microscope and placed carefully on a flat stage. Handheld models reverse this dynamic. They allow you to bring the microscope directly to the specimen, meaning you can easily inspect a massive boulder, the side of a vehicle, or a large canvas painting without dismantling the object.

Common Types of Handheld Digital Microscopes
The market offers several variations of handheld microscopes, categorized primarily by how they transmit and display their video feed.
USB Digital Microscopes
These are the most common and straightforward models. They feature a physical cable that plugs directly into the USB port of a laptop or desktop computer. The computer provides the electrical power to run the camera and uses software to display the live feed, record video, and often perform precise on-screen measurements.
WiFi Digital Microscopes
WiFi models maximize portability by severing the physical tether. They contain an internal rechargeable battery and a wireless transmitter. Once turned on, they broadcast a localized WiFi signal that you connect to using a smartphone or tablet. The live image is displayed through a dedicated mobile app, making them ideal for fieldwork and outdoor exploration.
Digital Microscopes With Built-In Screens
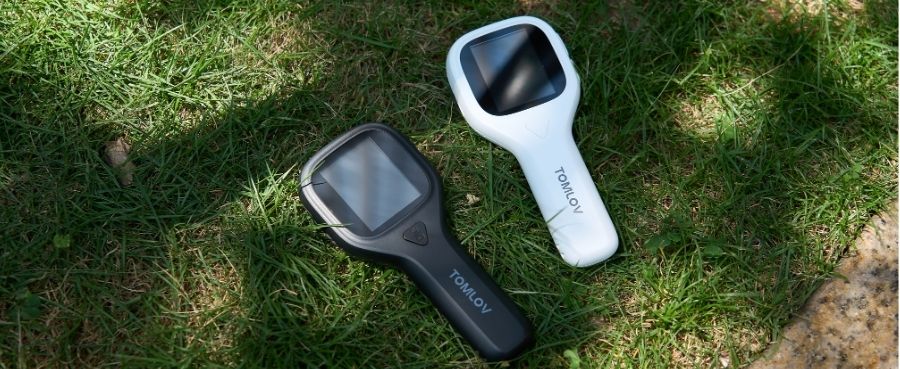
These are fully self-contained, all-in-one units. They feature a small LCD monitor attached directly to the top or side of the camera housing. They require no external computers, no software installation, and no smartphone pairing, making them incredibly intuitive and easy to deploy instantly.
What Can You See With a Handheld Digital Microscope?
Because you can point a handheld unit at virtually anything, its applications are incredibly diverse, spanning professional inspection to casual hobbyist curiosity.
Coins, Jewelry, and Small Objects
Numismatists use these devices daily to grade coins, verify authenticity, and hunt for incredibly small minting errors. Jewelers use them to inspect the integrity of tiny metal clasps and to check the surface of gemstones for microscopic scratches or structural inclusions.
Plants, Insects, and Natural Materials
In the field, you can press a handheld unit directly against a tree trunk to examine moss, or hover it over a resting insect to view complex wing structures and compound eyes without killing or capturing the specimen. It reveals the intricate geometric patterns of leaf veins and floral anatomies perfectly.
Circuit Boards and Small Electronic Parts
Technicians rely heavily on handheld units to inspect modern printed circuit boards. They are perfect for reading microscopic laser-etched serial numbers on microchips, verifying the flow of solder joints, and hunting for tiny hairline cracks in copper traces that cause electronics to fail.
Fabrics, Paper, and Everyday Surfaces
Under magnification, smooth paper reveals a chaotic web of pressed wood fibers and precise dot matrices of printer ink. You can easily analyze the weave patterns of different textiles, check the sharpness of a kitchen knife edge, or inspect household surfaces for structural wear.
How to Use a Handheld Digital Microscope
Operating a portable unit is straightforward, but following a systematic process ensures you get the most out of the optics.
Connect or Power On the Microscope
If using a wired model, plug the USB cable into your computer and launch the viewing software. For wireless models, turn the unit on, connect your phone to its WiFi network, and open the app. For all-in-one models, simply press the physical power button to activate the screen.
Place the Object Under the Lens
Position the tip of the microscope directly over your target. Many models feature a clear plastic spacer hood around the lens. You can rest this plastic edge completely flush against flat surfaces like paper or coins to establish a perfectly steady, baseline viewing distance.
Start With Lower Magnification
Instead of pressing the lens right up against the object immediately, hold the microscope an inch or two away. This gives you a wider field of view, making it significantly easier to navigate around the object and locate your specific target area before zooming in for extreme detail.
Adjust the Working Distance
Magnification on a handheld unit is largely determined by physical proximity. Moving the device physically closer to the subject increases the maximum achievable magnification, while pulling it further away decreases it. Set your desired physical distance first.
Turn the Focus Control Slowly
Once your distance is set, look at your digital screen and slowly rotate the textured focus wheel located on the side of the barrel. Turn it in small, deliberate increments until the blurry shapes suddenly snap into sharp optical clarity.
Adjust the LED Lighting
Use the integrated dimmer switch—often a small rolling dial on the cable or the device body—to control the brightness of the ring light. Shiny objects require dimmer lighting to prevent the camera sensor from being blinded by reflections, while dark, matte objects require maximum illumination.
Capture a Photo or Video
Once your image is perfectly focused and lit, press the physical shutter button on the microscope body or tap the capture icon within your viewing software to save a high-resolution digital photograph or record a video of the inspection.
How to Get a Clear Microscope Image
The biggest challenge with handheld optics is motion blur. Overcoming physical instability is the key to capturing professional-grade images.
Keep the Microscope Stable
Human hands naturally shake, and at high magnification, a millimeter of vibration looks like a massive earthquake on the screen. Whenever possible, rest your elbows firmly on the table, or press the clear plastic lens hood directly against the object to physically anchor the camera.
Adjust Focus Before Increasing Magnification
Lock in a crisp, clear image at a low magnification first. Once your eyes and the camera sensor have established a sharp baseline focal plane, you can physically move the camera closer for higher magnification and only need to make minor, manageable tweaks to the focus wheel.
Reduce LED Brightness When You See Glare
If your image looks washed out, features glowing white spots, or lacks surface contrast, your LEDs are too bright. Dialing down the illumination allows the camera sensor to capture the subtle shadows and textures that define the surface of the object.
Use a Stand for Detailed Inspection
If you need to use tweezers, screwdrivers, or a soldering iron under the lens, holding the microscope is impossible. Mount the handheld unit into a compatible articulating arm or a weighted desktop stand. This frees both of your hands and eliminates motion blur entirely.
When a Handheld Digital Microscope Is a Good Choice
While they do not replace high-powered laboratory equipment, portable digital microscopes excel in specific, highly practical environments.
Quick Inspection and Hobby Use
They are the ultimate tool for rapid verification. Whether you are at a flea market checking a coin for errors, or in a garage inspecting a spark plug, the ability to pull a microscope out of your pocket and get an instant high-definition view is invaluable.
Electronics and Repair Work
When repairing large, heavy machinery or awkwardly shaped electronics, you cannot always place the object on a microscope stage. A handheld unit allows you to maneuver the camera into tight engine bays or inside computer chassis to inspect components exactly where they sit.
Education and Home Observation

These devices are exceptional educational tools because they remove the learning curve associated with complex optical eyepieces. All-in-one models with built-in displays, such as the Tomlov P10 2" LCD Digital Microscope, are particularly effective here. They provide an immediate, self-contained viewing experience without requiring complex software setups or external smartphone pairing, making it incredibly easy for children and students to safely explore the world around them.
Final Thoughts
Handheld digital microscopes bridge the gap between a basic magnifying glass and a bulky desktop microscope. By understanding how to manage physical stability, control your lighting, and dial in the focus wheel, you can capture incredibly detailed images of everyday objects. Their unmatched portability and ease of use make them an essential optical tool for professionals, hobbyists, and educators alike.
FAQs
How Much Magnification Does a Handheld Microscope Need?
For inspecting coins, electronics, fabric, and general household items, a true optical magnification between 20x and 100x is more than sufficient. While many budget models advertise 1000x magnification, this is almost always heavily pixelated digital zoom rather than actual optical capability.
Can a Handheld Digital Microscope See Cells?
No. Viewing biological cells requires a traditional compound microscope equipped with transmitted bottom lighting and high-power objective lenses capable of 400x to 1000x true optical magnification. Handheld models are designed exclusively for viewing the surface details of macroscopic objects.
Can You Use a Handheld Digital Microscope Without a Computer?
Yes. If you choose a WiFi-enabled model, you can broadcast the image directly to your smartphone or tablet. Alternatively, you can purchase an all-in-one digital microscope that features its own integrated LCD viewing screen, bypassing the need for any external devices completely.
Why Is My Handheld Microscope Image Blurry?
A blurry image is typically caused by one of three things: hand tremors moving the camera, the lens being physically too close or too far from the object to reach a focal point, or the manual focus wheel needing fine adjustment. Bracing your hand against a table usually solves the issue.
Do You Need a Stand for a Handheld Digital Microscope?
While a stand is not strictly required for casual viewing and quick surface inspections, it is absolutely mandatory if you intend to use hand tools (like soldering irons or tweezers) under the lens, or if you want to capture perfectly crisp, professional-level photographs without motion blur.

Leave a comment
All comments are moderated before being published.
This site is protected by hCaptcha and the hCaptcha Privacy Policy and Terms of Service apply.